Tuesday, 30 July 2013

Kumquat Marmalade


My parents have two large kumquat trees in their backyard.  Some years they don't produce much fruit but this year they've been particularly prolific.

Whenever I visit them, my Mum offloads bags filled to the brim with kumquats.  So week after week, my fruit bowl at home seems to pile up higher and higher with kumquats.  My Mum calls kumquats 'Calamansi', which is the Filipino word for the fruit. In the Philippines they tend to squeeze them over savoury dishes instead of using a lemon or a lime.  At the Sydney Filipino restaurant, La Mesa, they even serve Calamansi juice as a sharp and refreshing drink.


Sometimes I also squeeze kumquats into a gin and tonic.  But a man can only drink so many G&Ts.

So I had to find a way to use these kumquats.  The most obvious solution was marmalade.  The difference between a marmalade and a jam is that a marmalade includes both the skin/rind along with the juice and pulp of the fruit.  It is more time consuming than a jam because you need to cook the marmalade down to a point where the rind becomes soft enough to eat.  Some recipes also ask you to soak the fruit in order to remove some of the bitterness from the pith.


Muslin cloth for the seeds


The good thing about kumquats is that they are tiny and their rind is very thin.  So it's less time consuming than, say, orange marmalade.

My kumquat marmalade turned out particularly well (I only made a small quantity, but should've made more!) It's very fragrant - kumquat rind is more floral and perfumed in taste than other citrus, and it really comes through.  It's also pretty tart, and ends on a bitter note - but reading other blogs and books about marmalade, it seems that for some people the bitterness is part of the appeal of marmalade.


This week I also made a Rangpur Lime Marmalade with Jasmine Tea.  I wasn't as pleased with this batch, but I'll post about it later this week!

Kumquat Marmalade Recipe

What you need:

  • 2 sterilised half pint jars;
  • 500g of kumquats;
  • 500g of sugar;
  • 500ml of water; and
  • Muslin cloth.
Making the marmalade:
  1. This recipe is very flexible.  As with most jam recipes, you need the same weight in sugar that you have in fruit, and then a comparable volume of water.  
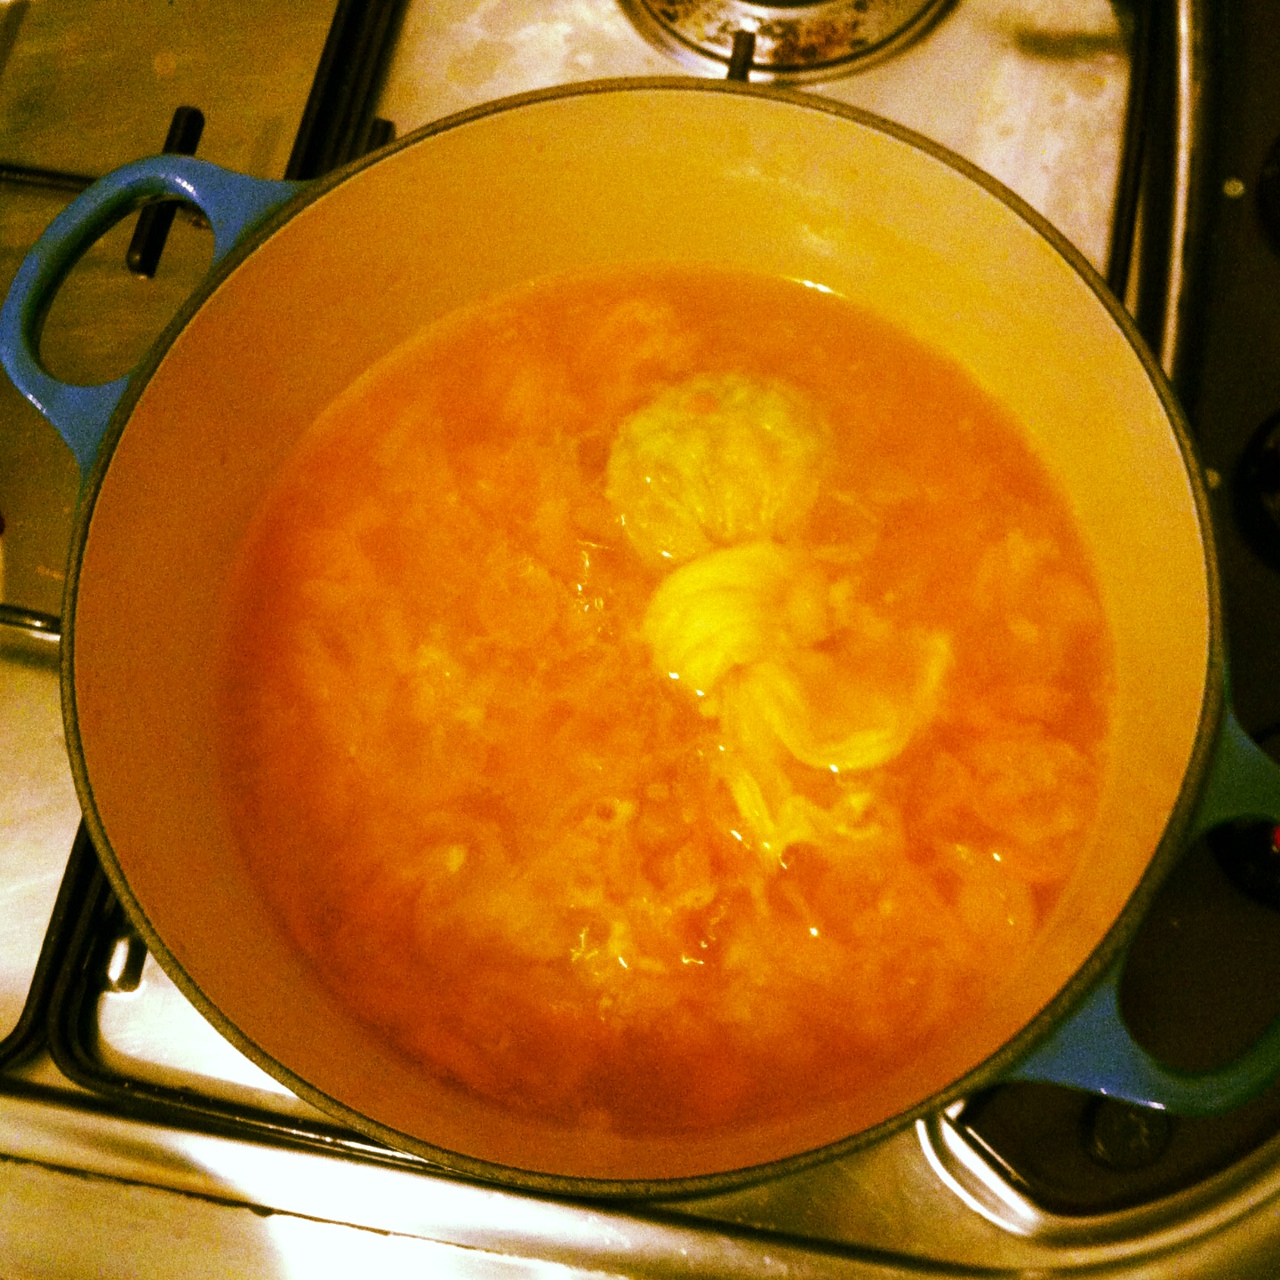
  2. The first step is the most time consuming step.  You need to slice all of the kumquats into thin circles, while saving all of the seeds/pips.  I did this by firstly slicing the stem off and discarding;  then squeezing out the juice into a pot while catching the pips as they popped out of the fruit.  It's pretty fiddly as you could imagine (partly the reason why I made a small batch!)  You should end up with lots of slices of kumquat rind, steeping in the kumquat juice.  Some recipes say you don't need to slice the kumquats up and simply cut them in half, but I prefer my marmalade to be less chunky.
  3. Put all of the seeds that you just extracted from the fruit into a muslin cloth and then tie the cloth up so the seeds are secure.
  4. Add the water and the cloth bag to the kumquat rind and juice and bring the pot to the boil.  Simmer for around half an hour or until the rind is soft.  You should be able to break the rind up between your fingers.
  5. Now, add in the sugar, stir the marmalade until it dissolves and then bring the pot to the boil again.  Simmer without the lid on for another half hour.
  6. To test whether your marmalade is ready, place a saucer into your freezer and let it chill for about five minutes.  You can then place a teaspoon of the marmalade onto the cold saucer and then put it in the freezer again for a minute.  When you remove the saucer the marmalade should have thickened to a point where a jelly-like skin has formed and if you tilt the saucer vertically, the marmalade doesn't run very quickly and pretty much sticks to the saucer.  If it's still watery, it's definitely not done.  Determining whether a marmalade/jam is ready is actually quite challenging, and I'd say that with experience, this will become easier for me.  
  7. When it's done, scoop the marmalade into the jars and allow to cool. 


Monday, 22 July 2013

Pickled Golden Beetroot


Yellow beetroot!?  Who would've thought!

I was in Canberra for the weekend with my girlfriend visiting her parents.  Her father is a more prolific pickler/preserver than I am, so I was more than happy to assist him in pickling some of the produce he had grown in his extensive garden.  He grows all different types of fruit and vegetables, but being winter at the moment in Australia, the selection was limited.  But luckily, he had some golden beetroot lying around.


Golden beetroot is a beautiful vegetable.  I had never cooked with it before, but after pickling it, I'd definitely grab some next time I see a bunch at the markets.  The deep yellow colour really emphasises the rings in the centre of the beetroot, so if you slice it the right way, you get some great yellow concentric circles.


Going through the family garden really made me want to get into growing produce - taking my pickling and preserving to another level by actually preserving things that I'd grown, or saving an abundant crop for later.  Apparently golden beetroot is actually quite difficult to grow.  It's very temperamental and "bolts to seed" quite easily (so I've learned that if a plant "bolts to seed", instead of growing good quality fruit or vegetables, the plant skips this step and produces seeds straight away.  It happens when the climate isn't able to support the fruit/vegetable growth, which is common in the dry, cold Canberra region).


Beetroot is one of those things that is quintessentially Australian.  It is what makes an Australian burger distinct from an American one. But tinned beetroot can really be overly sweet, and watery - turning sandwiches to a soggy pink mush.   This pickled golden beetroot will restore your faith in this root vegetable.


The recipe below is really quite simple.  It's great on sandwiches or with cheese, and has a more subtle beetroot flavour than your standard red beetroot - and is much less sweet than the canned stuff! Golden beetroot also has a really nice earthy taste, and the vinegar doesn't hamper this.  It's also less likely to ruin your favourite white shirt...

Pickled Golden Beetroot Recipe

What  you need

  • Around 1.5kg of golden beetroot;
  • 3/4 cup of white sugar;
  • 3/4 cup of water;
  • 1 and 1/2 cups of vinegar;
  • 1 tablespoon of black peppercorns;
  • 1 stick of cinnamon;
  • 2 cloves;
  • 1 teaspoon of salt; and
  • 2 bay leaves.
The pickling:
  1. First you need to cook your beetroot. Leaving the beetroot unpeeled, put them in a large pot and submerge them in water.  Bring this pot to the boil and cook them until tender.  This will take around 20 to 25 mins.  Once they are cooked, remove the beetroot and allow them to cool.
  2. While the beetroot is cooking, put all of the other ingredients  into a pot and simmer until the sugar has dissolved.  Allow this pickling brine to cool and  infuse for at least 20 minutes.  
  3. Then, peel the beetroot and slice them into circles around half a centimetre thick. 
  4. Strain the pickling brine so all the spices are removed.
  5. Add the beetroot into sterilised jars, and then fill the jars up with the strained pickling brine.
  6. Seal the jars and wait at least two days before digging in!  You can store them in a cool, dark cupboard until opening them, but then store them in the fridge. 


Monday, 15 July 2013

Lemon and Lime-oncello with a hint of Eurovision


I was having dinner one night with some close friends who live across the road from us.  I'd heard good things about Vacanza in the Hills Pizzeria in Surry Hills so we decided to check it out.  The pizza was fantastic.  Probably the best pizza I've had in Sydney (which I know is a big call, but having tried some of the other places in the area like Lucio Pizzeria and Pizza Mario, I think Vacanza takes the cake - or takes the nutella calzone and tiramisu desserts which were on the menu).


We had almost finished our pizzas when we realised that we hadn't received one of the other charcuterie dishes - a mortadella special.


The process killed one of our peelers...
Eventually it arrived, and the waiter was really apologetic.  At the end of the meal, he brought out a tray of  limoncello shots to make up for the lateness of the mortadella.   The limoncello was excellent and turned out to be a bit of a highlight of the meal.  It was really smooth and extremely lemony, without the harshness of some of the other limoncellos I've had.


Sipping on the bright yellow liquer, my mate (who brews his own beer) raised the question of whether we could actually make our own limoncello.  Coincidentally he and The Darling Baker had quite a few limes lying around that needed using, and we couldn't think of any reason why limes couldn't be added into the mix, so we decided to concoct a Lemon AND Lime-oncello as a bit of an experiment.


While you'd think the most important ingredient in limoncello is the citrus, I'd say the most important ingredient is actually the alcohol.  The stronger the alcohol, the more of the lemon flavour and colour is extracted. Many American recipes ask for a spirit called Everclear, which is a grain alcohol that is close to 100% alcohol, but we couldn't find anywhere in Sydney that stocked it and we didn't want to go to the expense of shipping it out from the USA.


My mate did some research and found out that you could actually purchase a 95% grain alcohol from Dan Murphy's called Rectified Spirit.  The stuff is actually from Poland, and is so potent that you have to ask for it at the counter because they keep it locked up in a cabinet.  The bottle is labelled with the Polish words "SPIRYTUS RECTYFICOWANY" which made us slightly concerned about how strong it would be and whether it would taste any good.  It comes in a small 500ml bottle with a price tag of $58.99, so we decided that it wasn't very cost effective for us to only use the rectified spirit to make the limoncello.  Also, we thought it would be prudent to add some vodka into the mix too, as a way of possibly taking the harsh edge off the rectified spirit.


The process involves a fair bit of patience.  It's time consuming grating or peeling off all of the rind from the fruit.  We did this while watching the Eurovision song contest on SBS.  I definitely think the cheesy songs, unnecessary fireworks, and over the top costumes/strange haircuts (see below) really enhanced the flavour of the limoncello in the end.


The other annoying part of making limoncello is that you have to wait three or four weeks until the alcohol has extracted all of the flavour from the rind.

So did the experiment pay off?  Yes, most definitely - it was worth the effort and patience. The end result was really tasty and extremely lemony.  I couldn't distinguish the lime flavour from the lemon, but I'd say you would be able to tell the difference if you compared our batch to one without limes.  We filled some old bottles up with our concoction and now they're perched on my book shelf, ready for a quiet nightcap, or a lemon fuelled rampage.


Lemon & Lime-oncello

What you need
  • 30 limes;
  • 10 lemons;
  • 500 ml of Rectified Spirit;
  • 700 ml of good quality vodka;
  • 1750 ml of sugar syrup made from 2/3 cup of sugar to every cup of water;
  • Coffee filters.  
What happens next:
  1. Before you can grate or peel off the lemon/lime rind, you need to remove any wax that would have been used to preserve the fruit.  You can do this by dropping the fruit into boiling water for 30 seconds.  When we tried it, we may have left our fruit in the boiling water for too long, as the fruit turned out a bit soft.  This just makes it slightly more difficult to grate.
  2. Grate or peel off the rind from the lemons and limes, ensuring that you try to minimise the amount of the white pith which apparently makes the limoncello bitter.  It's a good idea to use good quality peelers or graters - one of my flimsy peelers was completely annihilated in the process.
  3. Put all of the rind into a large jar that can hold 1200ml of alcohol.  Then pour all of the rectified spirit and vodka over it.  Note:  Do this step away from open flames.   
  4. Seal the jar up tightly and leave in a cool, dark place for 3-4 weeks, or until all of the yellow colour has come off the rind and the rind is pretty much white in colour.  
  5. Then, four weeks later, brew up a sugar syrup, with two thirds of a cup of sugar to every cup of water.   You need around 1750mls of sugar syrup to dilute the limoncello's alcohol percentage down to a palatable level of 25% alcohol.  This is around 4 and two-thirds cups of sugar.  You can dissolve the sugar into the water over the stove, but allow it to cool before adding it to the alcohol solution.
  6. You then need to strain the alcohol that has been soaking in the rind through the coffee filters.  This takes quite a while, as you could imagine, and you need to keep changing the coffee filters regularly because, as we found out, they tend to break.  But this removes all of the rind and stops it from being gritty or cloudy.  
  7. Finally pour the sugar syrup into the alcohol and then pour the final limoncello mix carefully into bottles.
We drank the Limoncello from these snazzy port sippers.  Apologies to the port drinkers.

Note:  Drink responsibly.  Avoid heavy machinery.  Jarhead does not condone the improper use of lemons and limes as described above.  

Sunday, 7 July 2013

Japanese Style Pickled Daikon


  Daikon is an extremely underrated vegetable. To describe it to those who haven't heard of it, it's pretty much a big, white radish, that resembles a long, white carrot, but you also see some short fat daikons - they are really quite strange looking things. Daikon is extremely versatile and adds freshness and crunch to salads and other cold dishes.   It doesn't really have a distinct flavour other than a very subtle hint of radish.


I can't get enough of sushi and sashimi, and when you go to a Japanese restaurant you often see some grated daikon adorning the side of the dish beside a clump of wasabi or some pickled ginger (which is another pickle I'd like to try to make at some stage! Any recipe suggestions?)  It also features in Korean cuisine, served on the side of Korean BBQ and fried chicken - it really cuts through the grease.


On one sushi outing to Makizo in Edgecliff, we ordered a side dish of "assorted pickles".  There were three types of pickles, all highly coloured in pink, green and yellow.  The pink and green ones were unusual to say the least, and I'm still not sure exactly what they were (I'll have to find out), but the yellow pickled daikon was a really simple, sweet and sour pickle that went perfectly with a bit of sushi.  


Making it is very easy,  especially if you have a mandolin to assist with the thin slicing of the daikon.  I concocted the pickling brine for this recipe after looking at a few recipes online.  The main difference between pickled daikon and other pickles, is that pickled daikon uses rice vinegar.  All the recipes require this ingredient.  I managed to find a small bottle of it at the New Yen Yen Supermarket in Haymarket.  You can really find any Asian ingredient there and it's suspiciously cheap.  The brine is also diluted with water, which differs from other pickles that I've made for the blog.  So this should lead to a subtler, less sour/tart result.  


Another ingredient that kept popping up in pickled daikon recipes is ginger, which makes the daikon match perfectly with the soy and wasabi that would usually accompany sushi.  Finally, turmeric is added for colour - daikon would be pretty boring on its own and colour is so important in Japanese cuisine.  


I'm yet to taste the results, as I have to wait a couple of days before eating it, but I'll report back next week.  Also I'd love to hear from readers if you have any pickling project suggestions! What should I pickle/preserve next? 

Pickled Daikon Recipe

What you need:
  • 2 large daikons;
  • 2 heaped tablespoons of salt;
  • 1 cup of rice vinegar;
  • 1 cup of water;
  • 1 cup of sugar;
  • 2 tablespoons of turmeric; and
  • 1 thumb sized piece of ginger, julienned.
The pickling process:
  1. Peel the daikons, and then slice them thinly into circular discs, preferably using a mandolin. 
  2. Put the slices into a bowl and then add in the salt.  Toss the daikon in the bowl so the slices are coated in the salt. Leave the daikon for about 2 hours.  Most of the water in the daikon should be extracted by the salt.
  3. While the daikon is being salted, put the water and sugar into a pot and bring it to the boil.  Dissolve the sugar so the mixture becomes a sugar syrup.  
  4. Now, add in the vinegar, ginger and turmeric and leave to simmer of a low heat for a few minutes to infuse.  Remove the pickling brine off the heat. 
  5. After 2 hours, strain and squeeze away the extracted water from the daikon.  This will ensure the daikon stay crispy and not floppy.  
  6. Sterilise and few jars and lids, and then place the daikon into them, really packing it in.  
  7. Pour the vinegar over the daikon in the jars.  Seal the jars up with the lids and refrigerate for at least two days before eating! 


Tuesday, 2 July 2013

Food Flat-Lay - Perfect Cheese Platter


My girlfriend follows a lot of fashion blogs, and she's recently been telling me to do a "flat-lay"on Jarhead.  I didn't really know what she was talking about.

After a few blank stares and upon further enquiry, she explained that fashion bloggers sometimes post a flat-lay, which is basically a top-down photo which tends to feature a group of fashion items that the blogger is wearing/using at the time.  Popular Australian fashion blogger Shine By Three describes it as "Wardrobe Tetris".

I thought this was a great idea, and the above food flat-lay or "Food Tetris" is the result!

Firstly, this is food that we actually ate tonight.  Don't you just love having cheese for dinner in place of  a healthy/balanced meal!

So the key components of this cheese platter are:

  1. Cheese!  Tonight we have a West Australian vintage cheddar from the Old Cheddar Cheese Co, an Udder Delights Adelaide Hills Brie, and a chunk of Gorgonzola Dolce.  All of the cheese is from Harris Farm.  
  2. Pickled quinces made by some of my work colleagues (check out the Miss Smith Makes Facebook page).  The quinces were sweet yet tart, but also carried some of the spices in the pickling liquid well, making it even slightly savoury.   
  3. My caramel apple jam, that I blogged about last week.  It is a fantastic match with the sharp vintage cheddar and counters the intensity of the blue cheese.
  4. Dried Persimmons from my girlfriend's dad who shares my pickling/preserving enthusiasm, but has taken it a step further with the experimental fruit drying.  These persimmons were also grown in his garden! They're like a more subtle and much less sweet version of dried mangoes. 
So fellow Jarheads, what do you think of the flat-lay?  Is this something you would like to see more of on the blog in the future? And what would make up your perfect cheese platter?